Introduction
DotSpatial is an open-source project that contains controls which can be used to manipulate and display geographic information. This article provides a quick overview and functional code that will help you get started with DotSpatial. Some of the basic operations that can be performed include: loading a shape file, panning and zooming.
Downloading DotSpatial
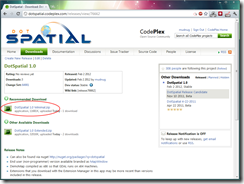
This article is based on the DotSpatial 1.0 Release — Minimal located on the downloads tab at http://dotspatial.codeplex.com
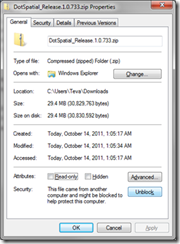
Note: Be aware that your browser may add an identifier to downloaded files which results in “blocked” dll files. You can click the following link to learn how to “Unblock” files. Right click on the zip file before unzipping, choose properties, go to the general tab and click the unblock button.
Once you have extracted the downloaded archive, you may run DemoMap.exe to get a sense of the capabilities in DotSpatial.
Creating a project
Start Visual Studio 2010 and create a new project. By using the Windows Forms Application template, a form is added to our project. Later, we will place visual elements on this form.
Adding Toolbox items
The toolbox provides a way to drag and drop controls onto the design surface of a form. Generally, when a control is dropped onto a form, Visual Studio will generate code necessary to instantiate the control, and add any required references to the project. You could instantiate the control without using the designer, by writing the appropriate code and making any necessary references.
Make sure the Solution Explorer is visible (View, Solution Explorer). Double-click Form1 to view it in Design view. Make the Toolbox visible (View, Toolbox). Optionally, create a new tab to contain the DotSpatial controls by right-clicking in the toolbox and clicking Add Tab in the context menu.
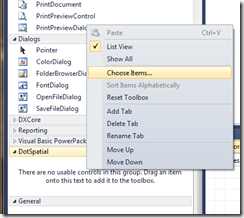
Right click in the tab you just created or in the General tab and click Choose Items…
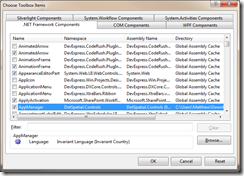
Click Browse… and navigate to the location where you downloaded the DotSpatial files. Select DotSpatial.Controls and click Open, then OK.
You should see a number of DotSpatial control fill the Toolbox.
Laying out the user interface
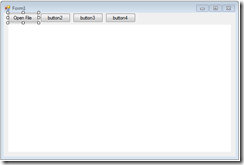
Drop four Button controls onto the design surface of Form1. You can find the button in the Common Controls tab of the Toolbox. Also, drop a Map control onto the form. You will probably want to resize the form so that there is more space for placing the controls.
Adding DotSpatial references
You will notice that Visual Studio adds a reference to DotSpatial.Controls when you drop the Map control onto Form1. If we try to build the project at this point, however, we are notified that we need to add additional references to the project.
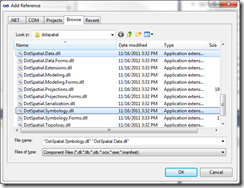
Add references to key DotSpatial libraries by clicking Project, Add Reference.…Browse to the location where you downloaded the files. Select DotSpatial.Data and DotSpatial.Symbology. You can select multiple files by holding the CTRL key while individually clicking on them.
Setting control properties
We return to the form designer to set properties of the various controls we have added. Again, this could be done in code, but properties may be easier to discover in the Properties Window. Select button1 and look at the Properties Window (View, Properties Window). Notice the Text property is “button1.” Change it to “Open File.” It is wise to change the name of the button as well to represent its function. Find (Name) and change it to “uxOpenFile.” Prefixing the button name with ux is simply a convention. You won’t be able to include spaces in a control name.
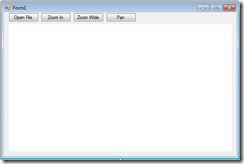
Similarly, update buttons 2-4 to represent Zoom In, Zoom Wide, and Pan. Remember to rename them. Rename the map from “map1” to “uxMap.”
If you were to run the project at this point, you would find you could drop a file onto the map control, but we haven’t yet wired up the buttons and they won’t do anything if you depress them. The designer in Visual Studio has a shortcut that will create a button event handler and take us to it so we can add our own code. Double click the Open File button. You are taken to the appropriate event handler. Type the following:
uxMap.AddLayer();
The AddLayer method will show the user a dialog so that they can select a relevant file to display on the map control.
Return to the form designer by double clicking on Form1 and create an event handler for Zoom In. Type the following code into the event handler.
uxMap.ZoomIn();
Now, when a user clicks the Zoom In button, the map view will lurch forward. You’ll similarly add the following code to deal with the situation when the user clicks the Zoom Wide button.
uxMap.ZoomToMaxExtent();
For the final button, instead of going back to the designer, just paste this code below the event handler for Zoom Wide. You need to make sure you paste it just after the event handler and above the two trailing braces }.
private void uxPan_Click(object sender, EventArgs e)
{
     uxMap.FunctionMode = DotSpatial.Controls.FunctionMode.Pan;
}
Now we need to attach this method to the uxPan Button. Double Click Form1 to return to the form designer and select the uxPan Button. In the Properties Window, click the lightning bolt icon to view Events. Type uxPan_Click into the Click Action.
When a user clicks the pan button, the cursor will change to a Pan (hand) symbol. In this mode, the map can be dragged from right to left, etc. While our previous event handlers execute methods, this event handler changes the FunctionMode of the map. The map will remain in pan mode until the user closes the application. Alternately, you could add buttons that would toggle the map into other modes.
Build and run your project and open a data file (see resource section for samples).
Points of Interest
You should be able to easily expand this project to include buttons which toggle between the Info, Measure, and Select tools.
This 1.0 release version supports the .Net 4 Client Profile.
Resources
dotspatial.codeplex.comAdditional information and documentation about DotSpatial
mapwindow6.codeplex.comMapWindow 6 – an extensible DotSpatial-based application
naturalearthdata.com Sample data files
www.diva-gis.org/gdata Sample data files




I have repeated your “create a first app” demo except within a WPF Page. That Page has WPF Buttons coexisting with the DotSpatial.Controls.Map control … it all works as the regular Demo does but adds the WPF controls. It’s just a nice little demo for anyone who wants to do this with WPF.
Hi, I am also trying to do all the steps mentioned in this post in the WPF Page but when I created the Page, all the dotspatial controls are available but inactive. I can’t drag and drop them. What am I missing? Can you please help?
Had the same problem because my .Net Framework version was set to 3.5… it needs to be set to 4….
Thank you for this. It helped me set up the environment 🙂
Sir,
I am using dotspatial.controls.dll in which i am facing some problems..
1.) Images of some buttons of Spatialtoolstrip is missing.
2.) Print is not working.
Regards,
Dheeraj
dgambhir143@gmail.com
I think you’re likely to get a faster response by posting at http://dotspatial.codeplex.com/ or perhaps on StackOverflow.